Custom Trunk Mat Installed
#1
 12-17-2006, 03:57 PM


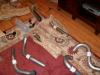
Well the trunk mat I was so happy to finally find has arrived and tonight I installed it. The whole thing took about 11 days to my door which I felt was very quick and faster than his estimate for completion although, i cant guarantee each order will be that fast I did enjoy getting mine quick. So here are install pics
This is sunken mirror with the letters painted in azure blue color.


Contact Phil @ http://www.granddesignmat.com/ to inquire about a custom order for you.
This is sunken mirror with the letters painted in azure blue color.
Contact Phil @ http://www.granddesignmat.com/ to inquire about a custom order for you.


#5
12-17-2006, 05:22 PM

it looks good man. i would do the same but i dont know what im doing w/ my car yet (selling for cobra or keeping it. lol)
#6
12-17-2006, 07:05 PM

Looks great. I made one for mine. Looks identical to that, but I didn't put any lettering on it. Nice touch!


#10
12-18-2006, 10:19 AM
for now stay with what I have and get some meaty tires. I was really wanting a larger wheel but realized that I couldnt get a good quality performance tire in a decent size in the 19" tire. I mean most of them are great tires but they are around 295/30 and I didnt want that small of a profile on such a big rim....didnt want rubber band tires. I liked the style I have so buying a new set of 18" didnt make sense right now

#12
12-18-2006, 01:23 PM
the trunk as you may know on our cars is fiberglass, as is the front hood. Anyway, I took a 1/8" drill bit and wrapped it in electrical tape about a 1/4" down on the bit. This made sure the drill bit didnt "punch" through too fast and damage the top layer of the trunk. I did that with the larger 1/4" bit also and it was cake. I just made sure I marked the holes real good with the sharpie and I was set.
The electrical tape trick isnt mine, it suggests that in the directions.....works great LOL
The electrical tape trick isnt mine, it suggests that in the directions.....works great LOL

#14
12-18-2006, 02:13 PM
the trunk as you may know on our cars is fiberglass, as is the front hood. Anyway, I took a 1/8" drill bit and wrapped it in electrical tape about a 1/4" down on the bit. This made sure the drill bit didnt "punch" through too fast and damage the top layer of the trunk. I did that with the larger 1/4" bit also and it was cake. I just made sure I marked the holes real good with the sharpie and I was set.
The electrical tape trick isnt mine, it suggests that in the directions.....works great LOL
The electrical tape trick isnt mine, it suggests that in the directions.....works great LOL


Thread
Thread Starter
Forum
Replies
Last Post
New Products
New American Muscle Products
0
07-18-2006 03:07 AM